Bestr Planning functionality
- 1. Introduction
- 2. Accessing the plan functionality
- 3. Plan Library
- 4 Annual plan
- 5 Weekly planner
- 6 Tips & Trics
1. Introduction
We have now added a new module to the Bestr Training Diary, a Training planner; the first version contains a library of plans, an annual planner, and a period planner(workout planner). Our goals for adding this planner are:
- Remove the need to use different tools for planning and logging performed training.
- Help the coach/athlete plan the loads correctly.
- Check that performed training is according to plan.
In this document, we will describe the essential features of the planner and how to use them.
2. Accessing the plan functionality
You access the planning functionality simply by pressing the Plan header tab at the top of the website.

3. Plan Library
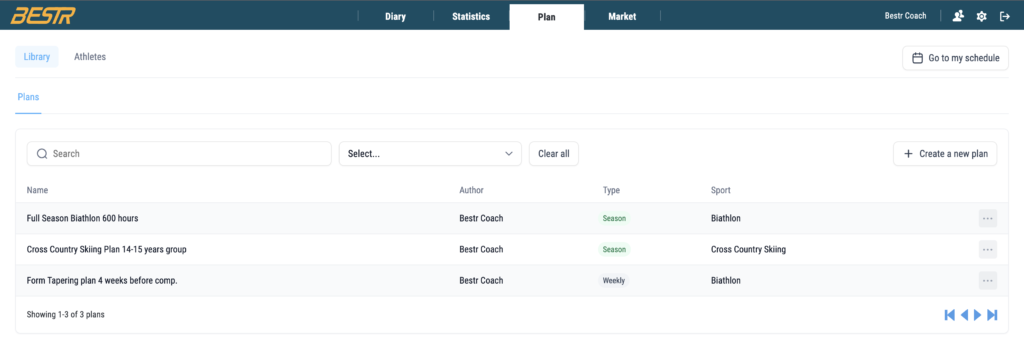
The entry page of the planner is the Plan library, here you can access your stored plans, create new plans, or go directly to your schedule.
3.1 Create new plan
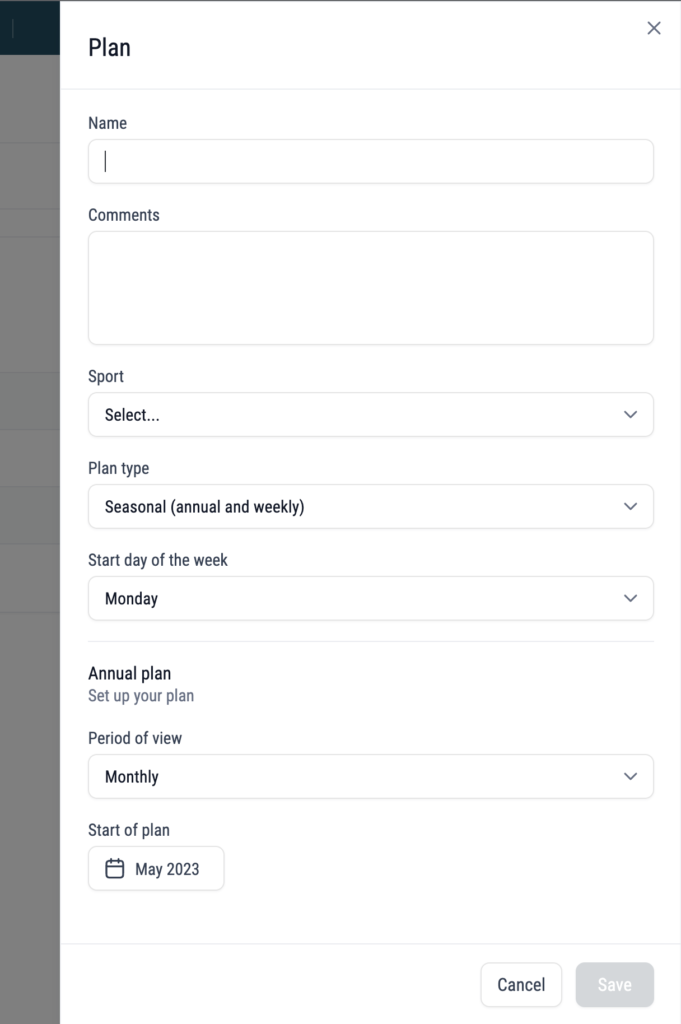
When you press the button Create New plan, you are presented with a Sidepanel where you will be presented with the mandatory info about the plan.
The different fields are:
Name – The plan’s name is what will be listed in the library, and when the plan is applied to another user, the name identifies the plan. Therefore it is good practice to give a name which indicates the content of the plan and makes it easily identifiable.
Comments – Use the comment section to describe more details for the plan, for instance, the goals, how many hours per week, etc.
Sport – The annual plan and the weekly planner use sport-specific parameters, so if the plan is for yourself, you must set it to your sport. If the plan is for an athlete, you must make sure the plan is made for the same sport the athlete(s) are using.
Plan type – You can make two plans type of plans in the diary. Seasonal, which includes annual plans and weekly plans for a whole season. Weekly, which contains weeks with planned workouts, is not coupled with annual data or specific dates.
First day of week – Here you set what day of the week for the weekly planner.
If you choose the Weekly plan, you are all set; no more data to register about the plan. If you choose the seasonal plan, there are a few more fields to register.
Period of view – What viewmode the annual plan should have? It can be Monthly, Periodical(4 weeks periods), or weekly.
Start of plan Which month will be the first of the annual plan.
Note! after you have stored a plan it is only the name and description you can change. Also if you for instance change Plan type in your schedule, the registered data in the Annual planner will be erased.
3.2 My Schedule
My schedule is the actual plan for the athlete. It contains the same as a seasonal plan (annual plan and weekly planner), but it has no start or end date. By default, it uses the first date of the current season as the start of what is viewable. It is essential to understand the difference between the library’s plans and the users’ schedules. The coaches cannot see their athletes’ libraries, but they can see their schedules, and the coaches can also edit the athlete’s schedules the same way as the athlete can.
Pressing the My Schedule button will redirect you to the Annual planner of your diary.

3.3 Athletes tab
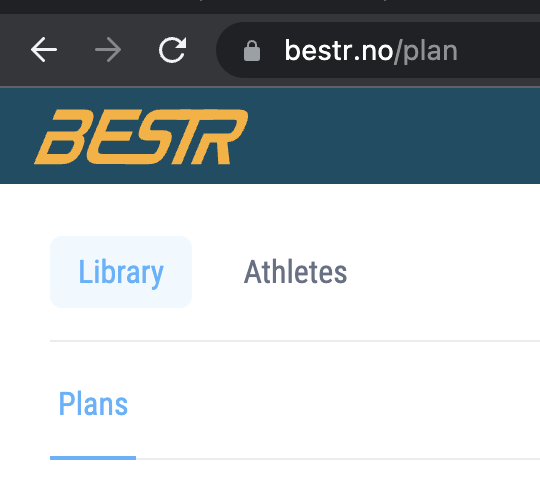
By Pressing the Athletes tab, the coaches will get a list of all their athletes, and they can access their schedules directly.
3.3.1 List of your athletes
In the athletes tab all the athletes of a coach is listed, the list can be filtered by sport if it contains many athletes.

By clicking the icon to the right of the row for the athlete you want to look at, you will access the athlete’s schedule; by default their Annual planner will be opened.
3.4 List of plans
The library contain a list of all the plans you have made. (later also workouts)

You can find a plan by searching for keywords in the plan names, you can also filter plan by sports.
Each plan has a menubutton on the right hand side on the row, where the following action can be done.
- Open
- Edit
- Apply plan
- Delete Plan
Later «copy plan» will also be added.
3.5 Plan applying
Plan applying is to copy a specific plan into a users schedule. As a coach you can apply a weekly plan or a seasonal plan to one or more of your athletes, by using the Apply plan option on themenu button for the plan.
When you apply a plan to an athlete, the workouts in the weekly planner will be added to the already existing ones. But if the athlete has data in the annual planner these data will be overwritten by the annual planner of the new plan. It is possible to remove workouts from an applied plan, if the athlete no longer wants to follow this plan.
3.5.1 Apply a seasonal plan
After you have pressed Apply plan option for a plan, you will get a side panel like this:
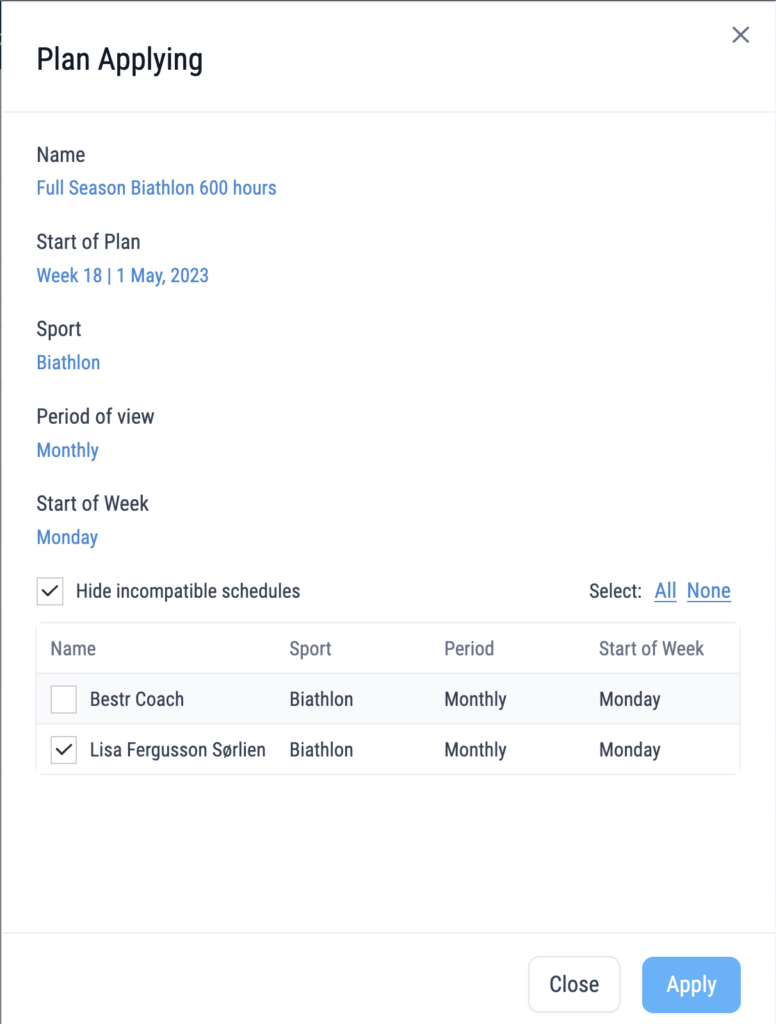
Select the user who should get the annual plan, and the planned workouts into their schedule.
You can only apply the plan to users who are setup with the same sport as the made plan.
3.5.2 Apply a weekly plan
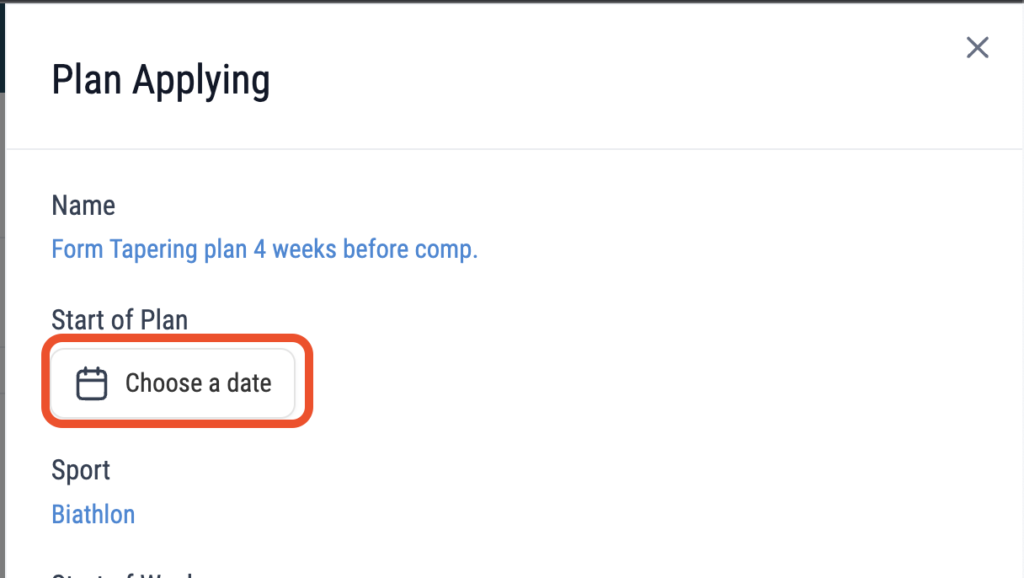
If you choose to apply a weekly plan, you get the same side panel as for seasonal plan, but you must also set the startdate for the plan. Since weekly plans are not stored with any dates, you must select which week you want it to start. It is week-specific, so if the workout is planned for a Monday, it will always be applied to a Monday. Applying a weekly plan will keep all of the already planned workouts. If you want to switch from one plan to another, you can remove previously applied plan, described in next chapter.
3.5.3 Remove applied plan
If you no longer want to follow an applied plan, you can remove all the data in your schedule which comes from this plan. From the «More Menu» in annual plan or weekly planner you can select show history applying.
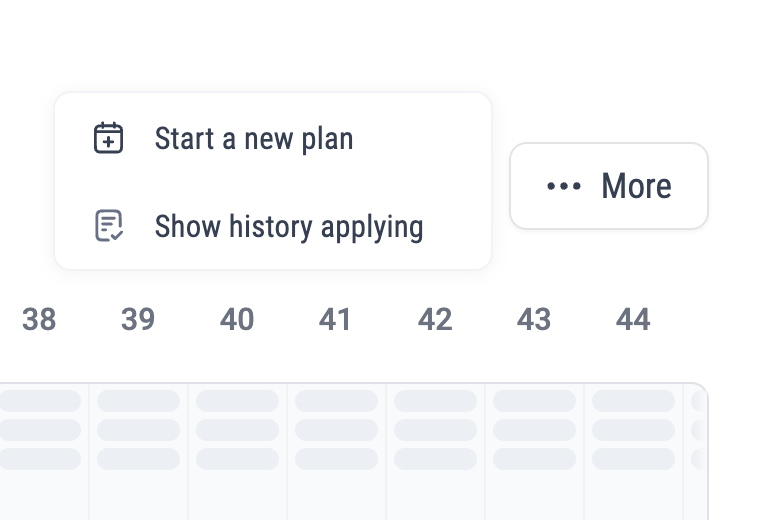
When you have done this you get a list of all applied plans to your schedule
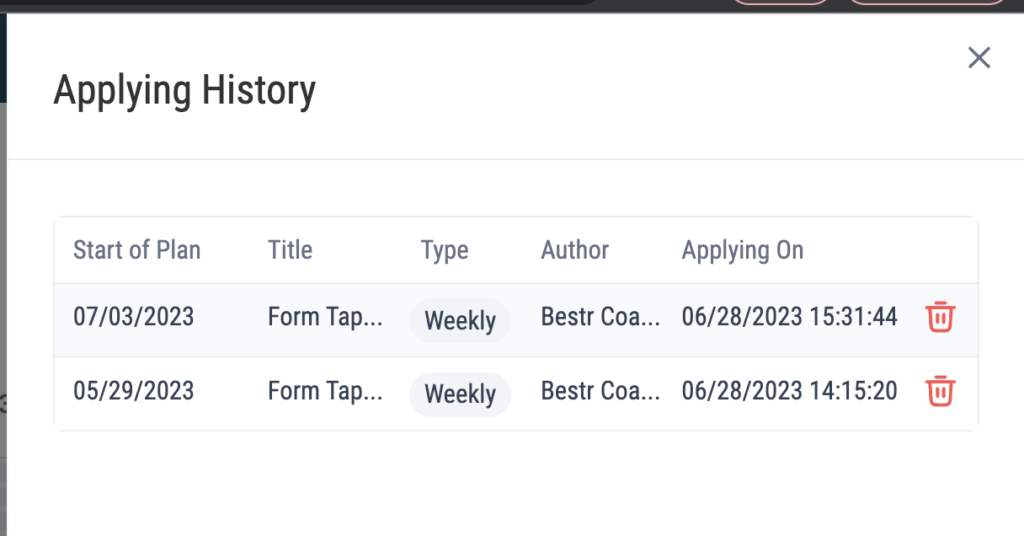
In the example above the user has been applied two plans, both of them weekly plans.
«Start of Plan» shows at which date in your schedule the plan is starting. «Title» is the name of the plan, «Author» is who has created the plan, and «applying on» shows when the plan was assigned to the user.
When you click the delete-icon you are presented with this popup:
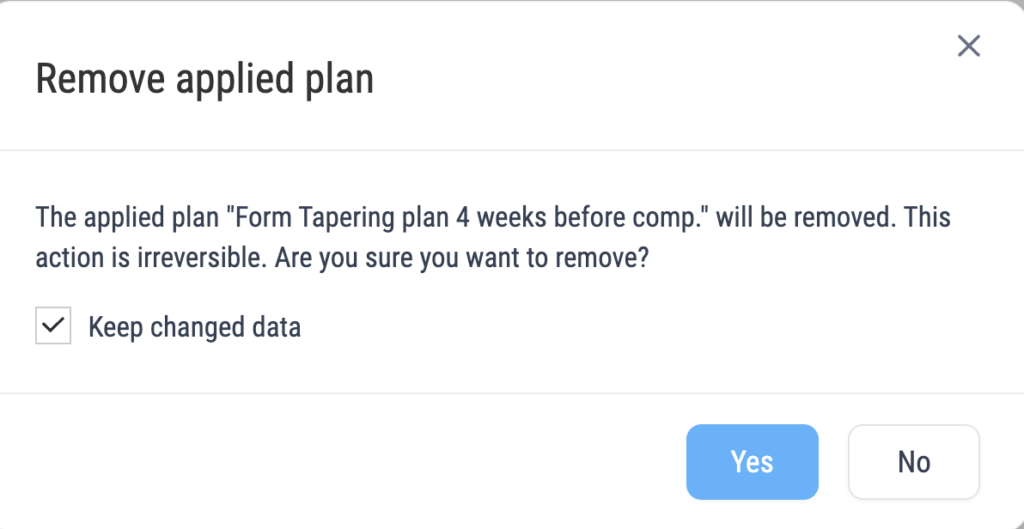
«Keep changed data», means that if you have changed any of the workouts or data from this plan in your schedule this data will not be deleted. If you have changed many of the workouts form the plan, and remove this plan and keeping changed data, you have no longer any possiblity to remove these workouts in one operation. You will need to delete them from your schedule one by one if you.
4 Annual plan
The purpose of the annual plan is for the user to plan the load of sport-specific parameters for one season. The annual plan consists of different sections and also displays data from other planner parts. The different sections and view modes for the planner is described here. Below is an example of an annual plan.
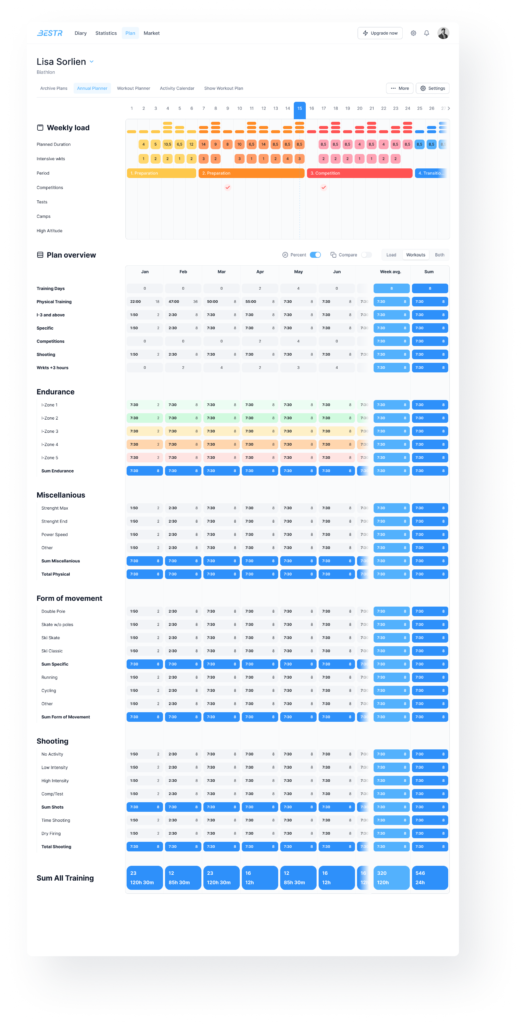
4.1 Weekly Plan section
The weekly load shows the weeks’ load, often called microcycles in periodization models.

4.1.1 Weekly load

You can set the weekly load directly here in the annual planner, by clicking on levels 1, 2, or 3 for each week, or it can be done when you plan the workouts for every week. In Bestr we have defined four levels for each week: None, Easy, Moderate, and Hard. It will be up to each coach/athlete to interpret if Hard means hard regarding intensity, training volume, or both.
4.1.2 Total hours
Note for swimming, this will show the total distance.
Here you can register the total load for the week in terms of hours or distance(swimming). As of today, this field has no integration into the weekly planner. The purpose is mainly to show the periodization of the weeks.
4.1.3 High intensity sessions
Here you can register the number of high-intensity sessions per week (mostly used in endurance sports). For more technical sports the coach/athlete can decide their own interpretation of this field.
4.1.4 Macrocycles
Macrocycles it the longest planning period in Bestr, it can contain the whole season. You will click inside the table to open the sidepanel where you define your own Macro and Mesocycles, this will be explained in 4.3.4 How to Periodize in Bestr section.
4.1.5 Mesocycles
A mesocycle refers to a particular training blocks within a macrocycle. You will click inside the table to open the sidepanel where you define your own Macro and Mesocycles, this will be explained in separate section 4.3.4 How to Periodize in Bestr section.
4.1.6 Future functionality
We will develop an event calender, in this weekly plan section you will see when your planned event for the season will take place.
4.2 Annual plan section
The annual plan section lets you plan the load for the season, grouped by the time-periods you have set for the plan.
The different periods you can have are:
- Monthly, you will plan load and workouts for each month of the season.
- 4 weeks period, you will plan load and workouts for each 4 weeks period. Many coaches prefer too plan in 4 week blocks as they will contain 28 days always, instead of months which vary in the amount of days.
- weekly you will plan load and workout for each week of the season.
4.2.1 Key numbers
The key numbers is the header section of the annual plan, it contains important parameters which are not necessarily related to the parameters of the training logger of Bestr. These number are decided together with top-coaches of each sport.
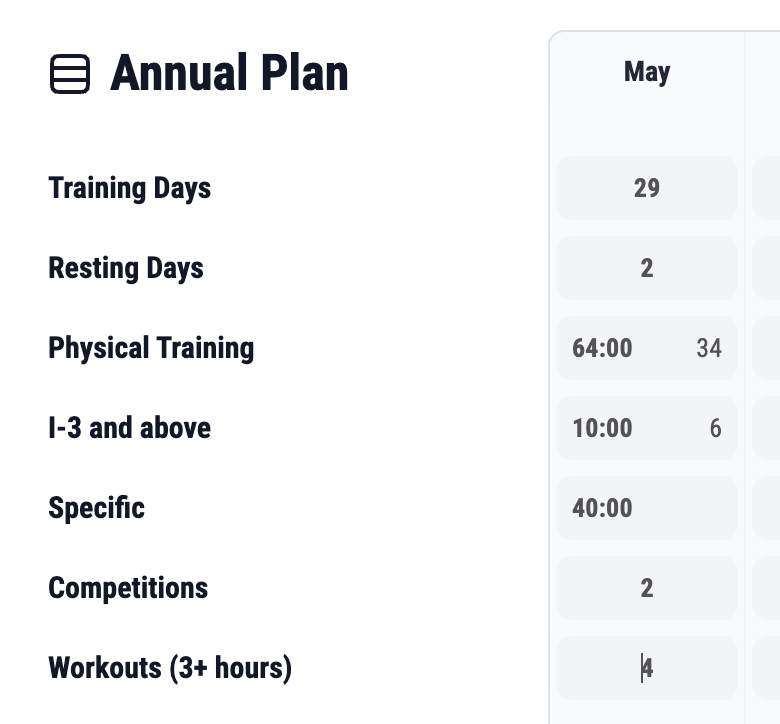
4.2.2 Load Section
Below the key numbers you will be able to plan the load of the same parameters as in the diary part of Bestr. Data can be grouped a bit differently in the planner than what it is in the diary, but mostly the same groups and data are kept.
4.2.3 Input modes for load in planner
User can choose between 3 different modes for the annual planner, this will only impact the parameters from the diary and not the Key numbers. User can switch between this mode, the planned workouts are only hidden if you choose to Load view.

The modes are:
4.2.3.1 Both

In this mode user will see both the load of a parameter(can be duration, distance or integer value) and the amount of workouts planned for this parameter. In the above example 14 hours are planned in 7 workouts. This is the default view
4.2.3.2 Workouts
In this mode you will see and register, the number of planned workouts.

4.2.3.3 Load
In this mode you will see and register, the load for the parameter.
In this example it is duration, 14 hours.

4.2.3.4 Future development
We plan to have a view mode for percent, so that user can check how the loads are distributed in terms of percentage.
We also plan a view mode for comparison, which you can use when the athlete has registered data in the training logger, to compare planned and performed training.
4.2.4 Sum of training in the annual planner
For the periods in the annual planner we have sums for groups and the total training for each period. We also show the sum of planned training for the whole year for each parameter.
4.2.4.1 Sum of group
A group can have a sum for each period in the annual planner, which show the sums of planned data for the parameters of the group.
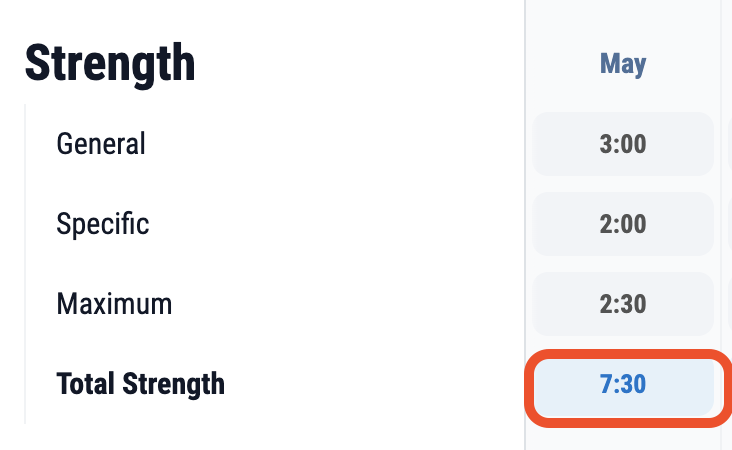
4.2.4.2 Sum inside of group
Some sports also have sums inside of a group, for instance Cross Country Skiing summarize the Ski-specific forms of movement.
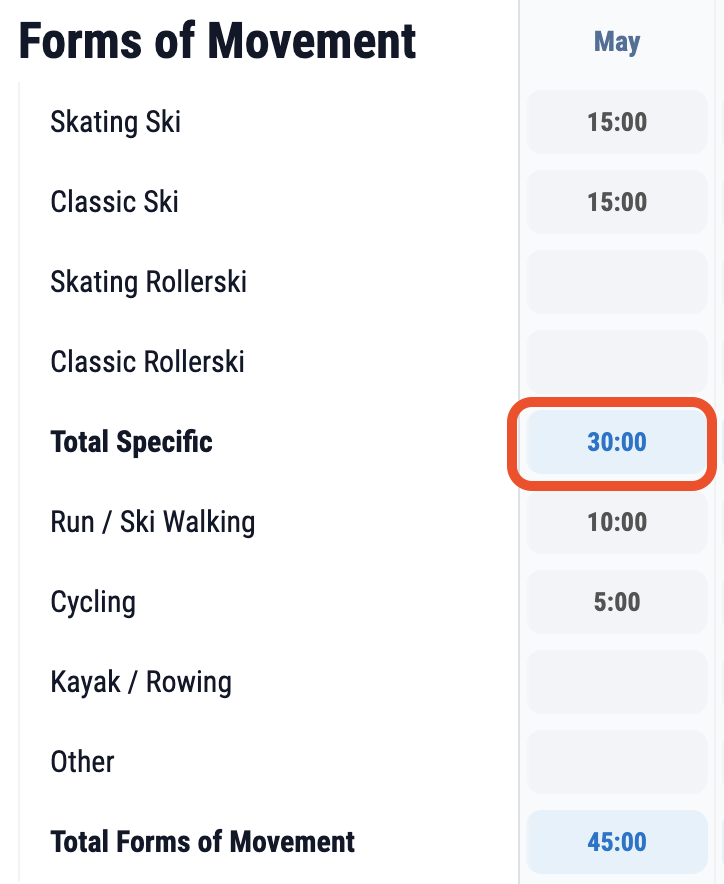
4.2.4.3 Annual sum and weekly average for parameters
The two rightmost columns show each parameter’s annual total and weekly average.
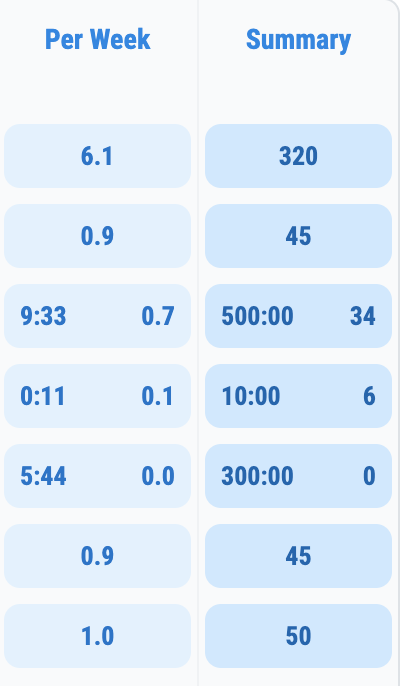
4.2.4.4 Period sum and Annual total
The bottom line shows the total planned training for each period(week, 4week or month), the rightmost columns shows the total planned duration for the Season.

4.3 Periodization
In Bestr we have 3 levels of periodization, Makrocycles, Mesocycles and Weekly periodization(Microcycle). In addition we will have a graph in the weekly planner which will show each day of the planning period. This can be used to see the planned load for each day.
Every coach can have their implementation of periodization, we will briefly describe a common way to periodize within a season.
4.3.1 Macrocycle
For sports with one competition period, it is the most common that the Macrocycle last for the whole season. And it will be defined a set of Mesocycles to plan the loads for the season in order to reach your peak in the competition period. For sports with more than one competition period in a year, the common way is to define one Macrocycle per competition period. And to divide each macrocycle into the same set of mesocycles. In Bestr you can plan as many Macrocycles as you want.
4.3.2 Mesocycles
Usually a Macrocycle is divided into minimum 4 Mesocycles, for instance Base Period, Competition Preparatation, Competition Period and Active recovery. In Bestr you can plan any amount of Makrocycles and Mesocycles.
4.3.3 Weekly load
In Bestr we have defined three levels for weekly periodization, a week can be Easy, Moderate and Hard. In some sports they have a bit different categorization of the weeks, for instance Easy, Intensive and High volume, in such cases Coach and Athlete just have to agree which of Moderate and Hard should mean High volume.
4.3.4 How to periodize in Bestr
To define your makro/mesocycles in Bestr you just click the area marked by the red rectangle below.

A side bar will then open where you can register the cycles.
It will look like this if you have no cycles planned:
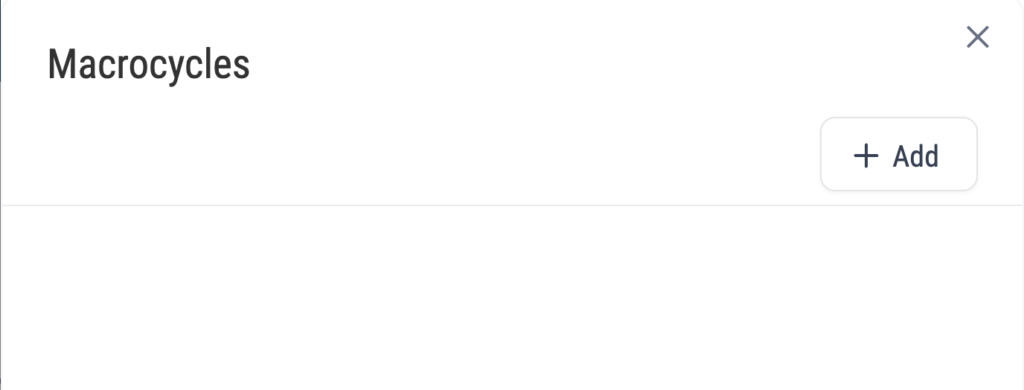
Press the Add-Button to add your first Macrocycle. Note that you cannot set the dates for the Macrocycle, the period for the Macrocycle is depending of the dates for the Mesocycles you define.
When you have pressed the Addbutton you can register your first Mesocycle and also give name to the Macroycle. like this:
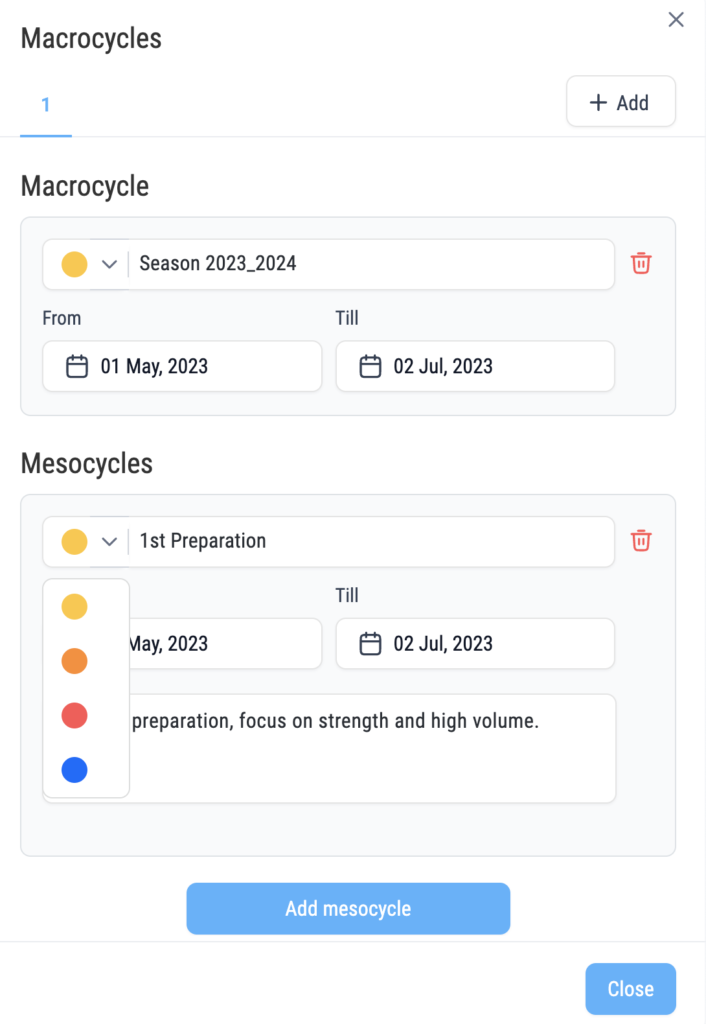
For each Mesocyle you add, you set the end-date, give a description of the focus for this cycle, and you can also give it one of 4 colors to visually being able to separate the cycles in the planner.
When you have added your Makro and Mesocycle it can look something like this:

5 Weekly planner
When you have planned your annual data, you will go the weekly planner to plan the workouts for each of the periods of the Annual planner. There will be 3 sections for this planner, The Focus and Goals, the workout planning and a summary section.
How many weeks which will be visible in the weekly planner is depending on the setup of the coupled annual planner. Annual plan grouped by months will display all weeks which have day in the current month. If you have chosen periodical 4 weeks view it will display 4 weeks. And if you have weekly setup of annual plan, it will display 4 weeks, and you will select the week to start from.
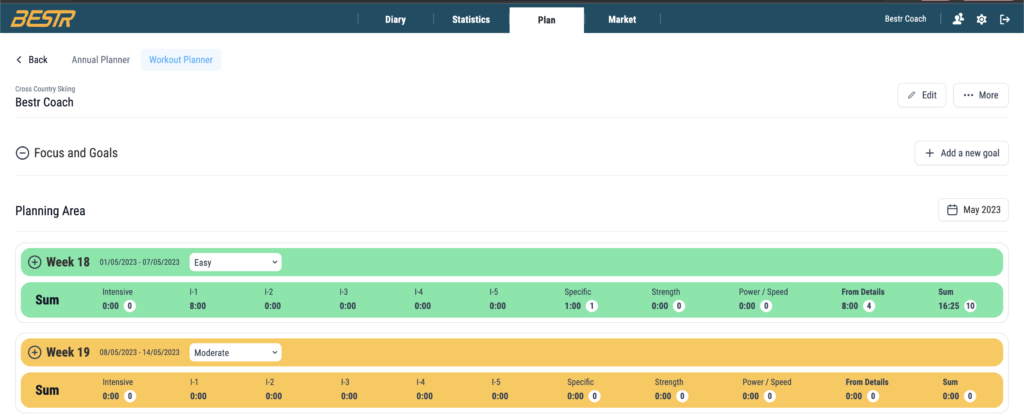
5.1 Focus and Goals – Add
The top panel of the weekly planner is the Focus and Goals. Here you can target the areas you want to improve in this period. You add a new goal by clicking on this button on the right hand side of the Focus And Goal panel: 
You will then be presented with the sidepanel where you register the goal and the description for the goal.
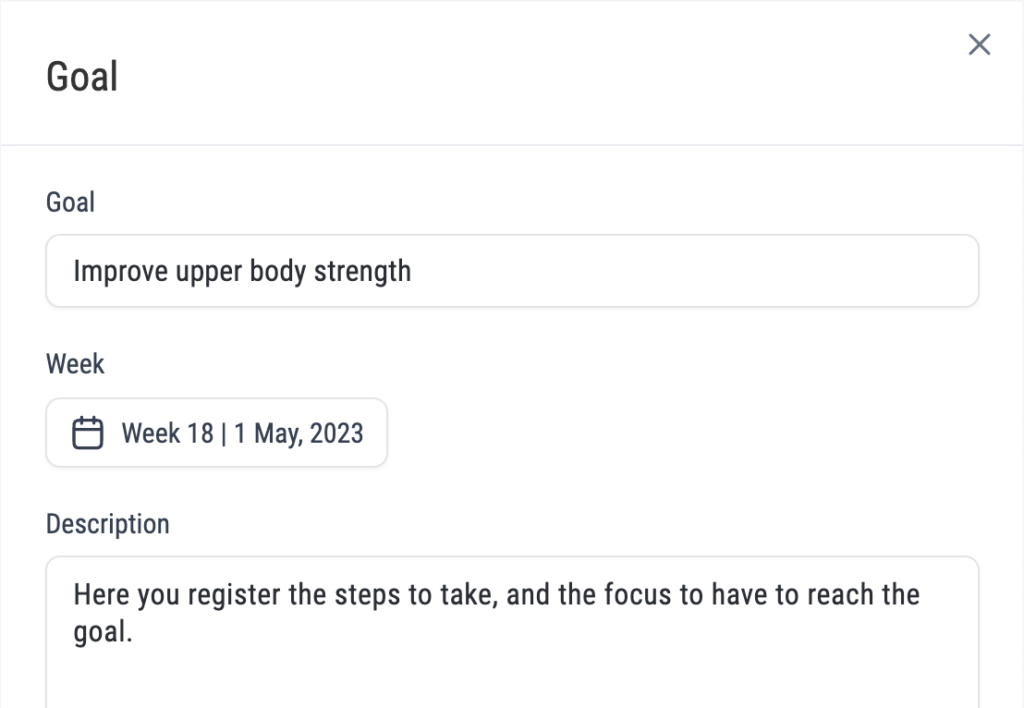
5.1.2 Minimize Goal panel
In order to have more space for the workout planning you can minimize the panel by using the button on the left hand side of the panel.
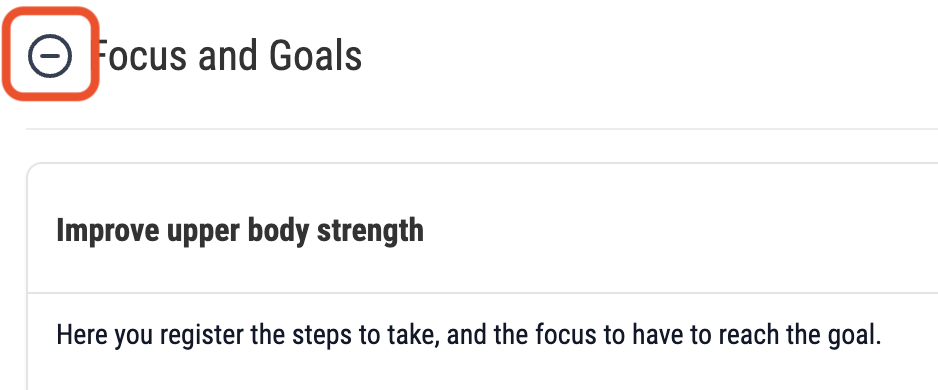
5.2 Week / Workout planner
In the week planner, you will plan each workout for the week. There are two detail levels for registering the planned workout. Either type the data you want directly in the table or edit the detail for the workout. If the purpose is to tell the athlete what to train, the first method will be the fastest and easiest. But if you want to get the sums for the distribution of the different parameters. And also allow the athlete to save the workout data directly to the diary(future functionality), then you should also register the workout details.
5.2.1 Navigating between periods
The navigation looks different depending on the type of plan you are making. The navigator is placed at the top of the planning area on the right-hand side of the page:

If you are making a weekly plan that is not couple to any annual plan the weeks of the plan will be paginated, showing 4 weeks at the time. SO you use the dropdown to select periods.

5.2.2 Elements of the week planner
Like the Focus and Goal panel each week can be minimized using the button beside the week number.
Expanded week will look like this: (colors for workouts are sportspecific)
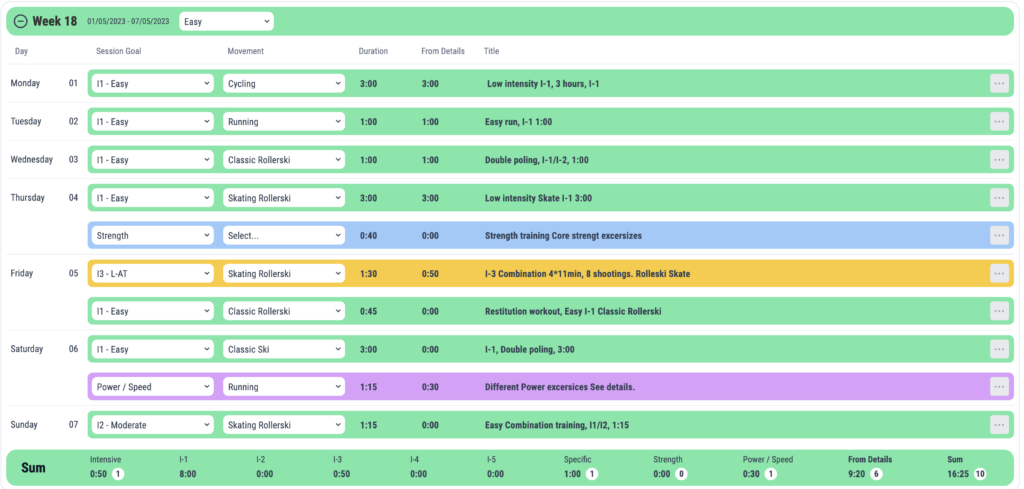
Minimized week will look like this only showing header- and sum-row.

5.2.2.1 Weekly Load selector
On the header row for the week, you can select the load of the week.
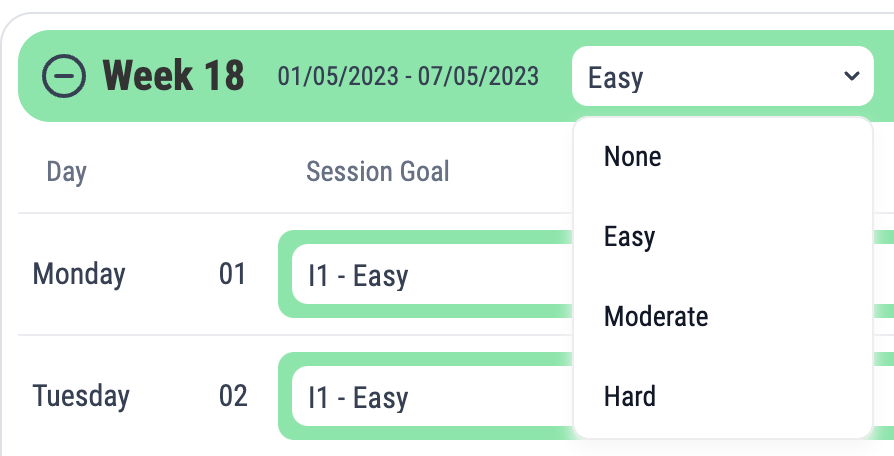
The background-color of the header row and the Sum row, will be changed based on the selection you make. None = Grey, Green = Easy, Orange = Moderate, and Red = Hard.
5.2.2.2 Sum Row
The sum row is mostly fields from the details of the workouts, if you only register duration in the table this sum will be shown in the rightmost column. The data is displayed here is sport-specific, the example in the image below is from Cross Country skiing.

The data in the white circles are the number of workouts planned for the specific parameter.
The Sum of training(«From details») comes from the details section. If you plan training both in this table and in the “details view” for every workout, these numbers should be the same.

5.2.3 Add/Edit workouts
As mentioned previously you can register the training for a weekly plan directly in the week table.
There are some sport-specific columns, and some columns which are the same for all sports. In this guide we show planning for Cross Country Skiing. There is no mandatory fields to register for a workout. But the more info you register the more clear it will be for the user, and it will also make it easier to compare planned and performed training.

5.2.3.1 Session Goal Dropdown
The session goal is the main purpose for the workout, the options to select from will be different for each sport. The background color of the workout will, depending on sport setup, be different based on your selection in this dropdown list.
5.2.3.2 Movement dropdown
The movement column is mainly used for endurance sports, to tell which Form of movement should be used for the endurance workout. The content is also sport specific, Rowing and Cycling will have different forms of movement for instance.
5.2.3.3 Duration
Here you can register the total duration of the workout. This duration will be summarized in the sum-cell at the bottom of each week.
5.2.3.4 From Details
This is a read-only field where the total duration of the registered details of the workout is listed.
5.2.3.5 Title
This is the title/name of the workout. Often a workout can be fully described in this field using abbreviations.
5.2.4 Workout menu
For each workout there is a menu button on the right hand side:

The menuitems are:
- Edit excersice
- Insert row above
- Insert row below
- Delete row
5.2.4.1 Edit excersice
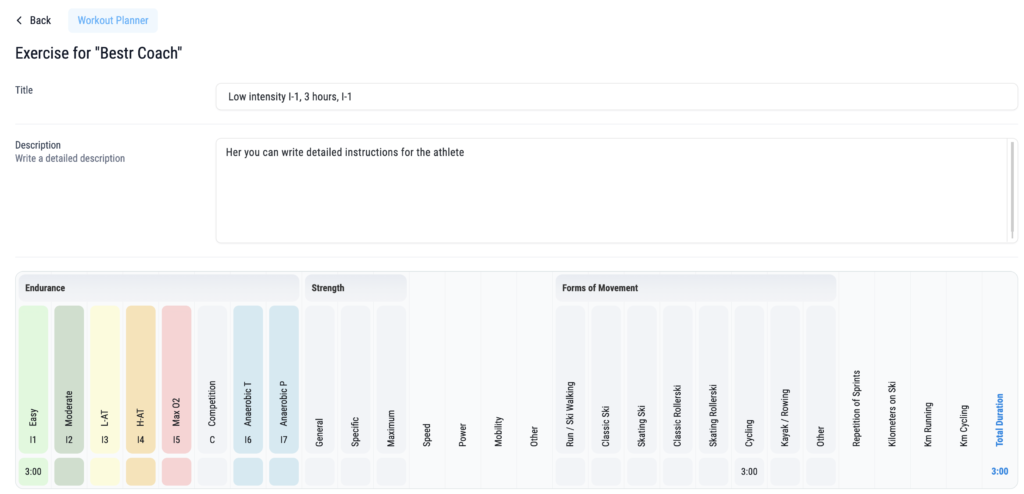
When you press edit excersice you will be able to register more details about the workout, such as a detailed description.
You will also get to register the same data as you do when you are registering a completed workout in the log-section. This details is needed to get all sums for the week, and in the future this data can be used to transfer workout from athletes plan to completed training.
6 Tips & Trics
6.1 Registering hours in the annual planner
If you want to register 40 hours for a parameter in the annual plan, typing just 40 will change to 00:40, i.e 40 minutes. This is standard behaviour for hh:mm formatted data. If you do not want to type 40:00 to get 40 hours. You can simply type «40.» (40 and a dot) then move away from the field and it will be 40 hours.
Need help?
Every day is a sport, and we are the experts
Please contact us if you need help or have any questions
Any questions about subscribtions or billing let us know.
Need help for setup an technical questions,we are here to help
Want to join Bestr, you can download here.
